|
 |
 |
 |
|
|
 |
  SERVICES SERVICES |
| 1. |
Plug in the drive, but do not turn on the power yet |
| 2. |
Click on "start menu" choose "control panel" in "settings" open "administrative tools". |
|
3. |
Open services, scroll down till you find "removable storage" and "plug and play". Double click on them both and under "startup type" make sure they are on automatic, click apply and then reboot. |
  JUMPER SETTING ALL ENCLOSURES
 |
| 1. |
Turn off and disconnect the enclosure, open it and check to see if there is a jumper in place on the drive. |
|
2. |
The jumper setting CS (cable select) should work for most drives, for most drives there is 3 to choose from MA (master), SL (slave), and CS (cable select). |
|
3. |
Once the jumper is in place make sure all cables are properly connected, close the case and reconnect the enclosure. |
| 4. |
If CS does not work try without a jumper, and repeat steps 1 through 3. |
  PARTITION DRIVE XP/WIN2K
 |
| 1. |
Plug in the drive, but do not turn on the power yet |
| 2. |
Click on "start menu" choose "control panel” open "administrative tools". |
| 3. |
Choose "computer management" choose "disk management" under "storage" |
|
4. |
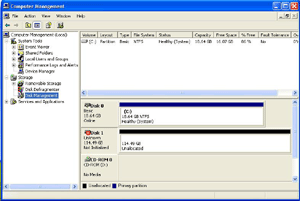
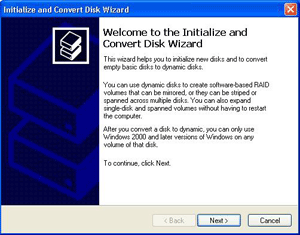
Choose "computer management" choose "disk management" under "storage", for XP a dialog “initialize and convert disk wizard” should appear automatically if it does skip to step 7. |
|
 |
| 5. |
If it does not read, "Not initialized" and reads "online" instead, you can skip to step 7. |
|
6. |
Right click on the left square area where a round red icon with a line through the middle is and select “initialize” (XP) OR “write signature” (Win2k). |
| 7. |
Click next on the window that appears to activate the disk, (note: there will be another disk that says "system", not that one) another smaller window will apear, have the square checked and click ok. |
|
 |
| 8. |
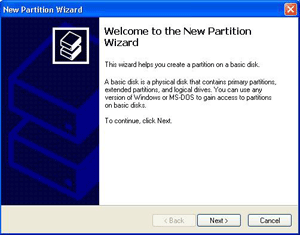
Right click on the right rectangular area where it reads "unallocated" and create a new partition. "Create Partition Wizard" will appear. |
|
 |
| 9. |
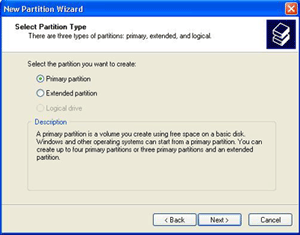
A "select partition type" window will appear, select primary and then click next. |
|
 |
| 10. |
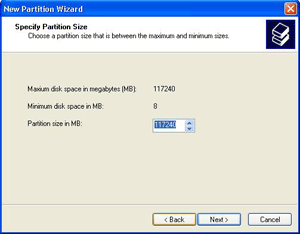
Next window "specify partition size" will let you specify partition size, leave as is and click next. |
|
 |
| 11. |
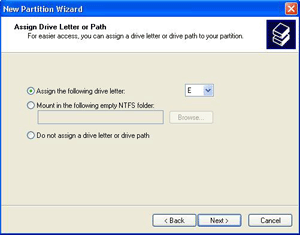
On the next window choose the drive letter, or just click next. |
|
 |
| 12. |
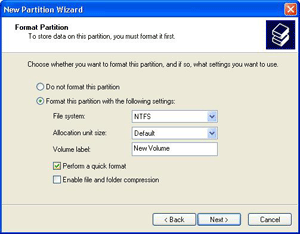
The next window "format partition" has the option of choosing fat32 (can be used on Win98, WinMe, and Win2k/XP but not optimized) or NTFS (optimized for Win2k and XP). NOTE: NTFS can only be used on Win2k/XP and higher. Another option is "quick format", it is recommended to have the box for a speedy format, which is also needed to write and read to hard drive. Last option is the "enable file and folder compression", it is not needed. Click next after selecting options. |
|
 |
| 13. |
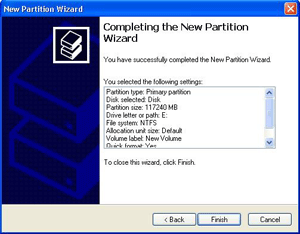
Last window is a confirmation of all selected options; click next to complete the partition and formatting of drive. After formatting is completed, the drive will be accessible from "my computer" |
|
 |
  PARTITION DRIVE WIN98/WIN98SE
 |
| 1. |
Install the driver from the included cd - WinME detects external drive automatically. |
| 2. |
Plug in the drive. |
|
3. |
Click on the "start menu" choose "control panel" in "settings" choose "system" open "disk drives" in the "device manager" folder. |
| 4. |
You should be able to see the usb2.0 hard driver you just added. |
| 5. |
Right click on the
USB hard disk and choose "property" then "setting". |
| 6. |
Specify the usb2.0 hard drive as "removable" |
| 7. |
Restart your system. |
| 8. |
A removable hdd will appear on "my computer". |
| 9. |
Right click on the removable hdd and choose "format" to format the drive. |
  PARTITION DRIVE MAC OS
 |
| 1. |
Open "disk utility" click "partition" find and select the new disk to partition. |
| 2. |
Choose partition settings, and then click ok. |
| ** |
For firewire external drive with
Mac os 8.6 or Mac os 9.0.x, install the latest update file from the below link.
http://docs.info.apple.com/article.html?artnum=86020 |
|
top |
|
 |
 |
| Question: |
When the drive is connected to the external enclosure properly and the computer recognizes the drive in the "Devices Manager". But, why "My Computer" does not show up this external driver? |
|
Answer: |
Please make sure you format hard drive properly before you install it into external enclosure. Check with your USB or Firewire PCI / PCMCIA card.
Please make
sure drive is set as master or cable select. Please use direct
usb connection at the rear of your pc; not case
usb; not usb hub.
Also, please
check under disk management; you may need to assign a drive letter manually.
|
 |
|
top |
|
Question: |
My computer operating system is Windows 98, can I still get CoolMax External Enclosure for my external hard drive? |
|
Answer: |
For Windows 98, customer just need to
download driver or driver provided from cd, then it’s no problem to use our CoolMax full range External Enclosure. |
 |
|
top |
|
Question: |
Does CoolMax USB V2.0 external enclosure compatible with USB V1.1 port? |
|
Answer: |
Our CoolMax Gemini Series External Enclosure are fully compatible with USB V1.1 and USB V2.0 interface. |
 |
|
top |
|
Question: |
Recently I bought 2.5” 40GB hard drive, should I get extra power adapter for my external hard drive? |
|
Answer: |
HD-211 series is upto 160gb USB BUS powered
HD-250 series is upto 250gb
USB BUS powered
For HD-211 series, we strongly recommend customer to get “Self Power External Enclosure (extra power adapter)” for 2.5” external hard drive, which capacity is over
160gb. |
 |
|
top |
|
Question: |
Should I adjust jumper position before I install hard drive into external enclosure? |
|
Answer: |
Yes, most of hard drive jumper should be adjusted to "Master" position before you install the hard drive. |
 |
|
top |
|
Question: |
I have two firewire drives and when I try to connect them only one drive shows up on the system, what is wrong? |
|
Answer: |
When the factory that we get the bridge boards from the chipsets they did not create a serial number for each chipset, so all of the chipsets we received on our shipment have the same serial number, 000000. Since the system can not communicate with two drives with the same serial number through the same bus you can not use both drives attached to firewire at the same time. |
 |
|
top |
|
Question: |
What HDD Format can be used? |
|
Answer: |
Actually,The manual indicate only if you use WIN 98SE, but if you are in WINXP or WIN 2000, then there is no problem using it as NTFS format |
 |
|
top |
|
Question: |
Why is there “WRITE DELAYED FAILURE” error on the firewire connection on the CD-311-sata? |
|
Answer: |
Please make sure firewire is not in a hub. Use direct Firewire from
your motherboard. Check Power for consistency.
The chipset incompatibilities is one of the problem also;
If your motherboard or pci firewire chipset is VIA, you need to goto MS to get the fix
http://support.microsoft.com/kb/885464
Windows uses virtual memory paging files on the hard disk as if it were RAM. By increasing the paging file size, your computer is able to handle larger data transfers with more comfort, Page Files size of 864Mb, and a maximum size of 1728Mb
HOW TO CHANGE YOUR PAGING FILE ALLOCATIONS:
Right click My Computer.
Select Properties.
Select the Advanced Tab.
Select the Settings Button under Performance.
Select the Advanced Tab under Performance Options.
Select the Change button under virtual memory.
Click on the Custom Size option for C: and multiply both the Initial and Maximum size values by 1.5.
Please also try to change the udma mode to udma5 or if not try to disable it too |
 |
|
top |
|
Question: |
CD-311-SATA COMBO: What hard drive format do I use for MAC?
|
|
Answer: |
Hard drive format for Mac should be FAT32. |
 |
|
top |
|
 |
|
Question: |
Are there any file size limitations? |
|
Answer: |
Yes. The FAT32 partition has a 4GB file size limitation. Backup programs such as Acronis Images will give you the option to split the file sizes in 2GB
or 4GB increments in order to work around such limitations. This is limitation of FAT32. |
|
|
 |
|
top |
|
Question: |
How do I FTP to the CN-550 from outside of my network? |
|
Answer: |
To FTP into your CN-550 from outside of your network, you must know the external IP address of your network. You must also have a router that has a Virtual Server (or Port Forwarding) setting to route the FTP port to the IP address and port 21 of the CN-550 is default.
note: FTP is an added feature and it is
configured differently by different users; dependent on router settings and
different security settings. Further FTP support request may not be
provided.
|
 |
|
top |
|
Question: |
What is the tested speed of the CN-550? |
|
Answer: |
With the latest firmware, the CN-550 has been tested at an average write speed of 5MBps (40Mbps), and an average read speed of 4MBps (32Mbps). While the CN-550 is rated for a 10/100Mb LAN, the CN-550 does not have the computing power of a computer to transfer at higher speeds. This is typical for SOHO NAS units. Enterprise level NAS units typically perform better because of their increased hardware specifications. The average transfer rate a Windows XP computer will see on a network is about 9MBps (72Mbps). We will continue to push the transfer limits of the CN-550 through firmware updates
|
|
 |
|
Question: |
Why won’t my printer work through my CN-570?
|
|
Answer: |
The CN-570 is intended to work with a standard usb printer. The CN-570 does not generally accept multi-function printers, such as a printer/copier/scanner unit. Most laser printers experience limited compatibility/capability when used through a print server. The CN-570 does not support bi-directional communication. The CN-570 will also not accept a standard parallel printer that is using a usb conversion adapter. These are limitations of print servers in general and do not apply to the CN-570 alone. Last, even though the CN-570 may recognize your printer on the printer page, the printer still needs to be network capable. Many of the less expensive USB printers do not have network capability built in. Check with your printer manufacturer to find out whether your printer is network capable or not.
|
|
top |
|
Question: |
Does the CN-550/CN-570 support Windows Vista? Having difficulty opening folders after connecting to drive.
|
|
Answer: |
If you are having problems with Vista logon to NAS devices, this will work:
VISTA ULTIMATE OR BUSINESS
Run secpol.msc
Go to: Local Policies > Security OptionsFind “Network Security: LAN Manager authentication level” Change Setting from “Send NTLMv2 response only”
to
“Send LM & NTLM - use NTLMv2 session security if negotiated”
VISTA HOME OR HOME PREMIUM
- Click start
- Type: regedit
- Press enter
- In the left, expand these folders:
HKEY_LOCAL_MACHINE\SYSTEM\CurrentControlSet\Control\
- In the left, click on the folder named:
Lsa
- In the right, double-click “LmCompatibilityLevel”
- Type the number 1 and press enter
- Restart your computer
|
|
top |
|
Question: |
How Do I know which Printers is compatible or not for the CN-570?
|
|
Answer: |
Please click the link HERE to check your printer's compatiblity |
|
top |
|
Question: |
CN-570 first time use instructions?
|
|
Answer: |
*Please follow instructions step-by-step. |
|
|
1. use usb interface, delete again the partition in disk management |
|
|
2. create primary partition |
|
|
a. do not format |
|
|
b. assign a drive letter |
|
|
3. change to rj45 interface |
|
|
4. access nettool_1.0 and click on the device found |
|
|
a. please download the nettool_v1.0 |
|
|
5. click on setup wizard and follow instructions |
|
|
6. click on access via web |
|
|
a. default password : user: admin password : root |
|
|
7. click on disk utility |
|
|
8. click SDA |
|
|
9. format to fat32 |
|
|
a. wait for some minutes to finish and a notification of Upgrade finished will pop-up |
|
|
10. once formatted, go back to nettool_1.0 and click on refresh |
|
|
11. click on the device; if you see NAS-HDD under USB info; you’re all set |
|
|
12. once you have set or changed any configurations on your NAS, you will need to restart the unit to take effect |
|
top |
|
 |
|
Question: |
My power supply doesn't turn on,
what am i doing wrong? |
|
Answer: |
Please do the following:
1.
remove all power cables from your board
2.
plug the 20+4pin to the board
3.
plug the other 4pin to the board
- Make sure case wiring
are connected to your board correctly
4.
turn on your power supply on/off switch at the back
5.
turn on your power on the case
- If power supply turns
on, your power supply should be working fine.
|
 |
 |
|
top |
|
Question: |
After connecting the Xtreme Files and installing the software, why is the icon
of Xtreme Files shown below?
|
|
 |
|
Answer: |
The possible conditions are as follows: |
| |
1. Your hard disk hasn’t been formatted. Please refer to the format descriptions in appendix A to format your hard disk.
|
| |
2. The hard disk has quack sound or can’t work and the system can’t detect it. The probable reason is that the output power of the computer’s USB port is insufficient.
|
| |
3. Did you connect the Xtreme Files to the hub? If yes, please connect it to the USB port of the PC.
|
| |
4. Did you use an USB cable of other
products, not the Xtreme Files’s USB cable? If yes, this will cause the system
to be unable to detect the Xtreme Files if the quality of the USB cable is not good enough.
|
| |
5. Please connect the Xtreme Files I as close as possible to the USB port of the PC keyboard socket.
|
|
top |
|
Question: |
Why
can’t the 3 buttons on the Xtreme Files Drive function after connecting the USB cable, the indicator is normal, and the computer has detected this device?
|
|
Answer: |
1. Please check if the installation
has been done. If not, the Xtreme Files Drive is only an external storage device. Please install first (refer to the steps of the original installation). The buttons can’t work if no installation is performed. |
| |
2. Please check if the flat cable of
the buttons in the Xtreme Files Drive case is loose. If yes, please connect it
to the Xtreme Files Drive again.
|
|
top |
|
Question: |
May
I change the hard drive of the Xtreme Files to enlarge the capacity for large files myself?
|
|
Answer: |
Yes, you can, but you have to install again after changing the new hard drive to assure that the operation is normal. |
|
top |
|
Question: |
May I do the backup on 2 different computers?
|
|
Answer: |
No, you can’t. The Xtreme Files’s OS backup function can support the OS disk backup on one computer only. It will cause data disorder if used on another computer. CoolMax will not guarantee data correctness if you restore the backed up OS to another computer. |
|
top |
|
Question: |
May I use the Xtreme Files Drive to back up the MAC system?
|
|
Answer: |
No. You can’t. The Xtreme Files Drive only supports Microsoft 2000/XP, but it still has the external storage’s function if used on another platform. |
|
top |
|
Question: |
May
I exchange the Xtreme Files Drive with my colleague?
|
|
Answer: |
No, you can’t. If the X-Treme Files Drive is not installed, the buttons can’t be used on other computers even if the computers have been installed with the X-Treme Files Drive. This special design is to assure data secrecy. |
|
top |
|
Question: |
Why can’t the Xtreme Files Drive
back up the data of other languages as error information is displayed? |
|
Answer: |
The problem is that your computer has not installed that language’s software. The computer will not back up as it interprets the files of that language as random code. Please install the software for that language for normal backup. |
|
top |
|
Question: |
When executing the OS Backup, why
is there no tableau for the backup execution but only the message shown below? |
|
The operation completed successfully |
|
Answer: |
The reason – BIOS support for the USB disk is not complete, which causes the DOS USB driver to be unable to detect the USB disk. |
|
The solution – Please connect to the website of the motherboard manufacturer to update BIOS of the motherboard and change the “BIOS Legacy USB Support” or “USB Keyboard” and “USB Mouse” setting to “Disabled”. |
|
top |
|
Question: |
What should I do when the computer hangs when executing the OS backup and the computer cannot return to Windows after restart? |
|
Answer: |
Please restore according to the following steps: |
|
1. Change the first boot device to CD/CDRW device in BIOS. |
|
2. Insert the installation CD. |
|
3. Restart. |
|
4. Take out the CD and restart when “Strike a key when ready…” is displayed. |
|
top |
|
Question: |
How can I restore the system if my computer can’t boot? |
|
Answer: |
If you have used the Xtreme Files Drive to do the OS Backup, please do the following steps to restore; if not, you have to install the OS again. The steps to restore: |
|
1. Please make sure the OrgOS.pqi file exists under the backup folder of the USB disk. You have to install the OS again if you don’t have the above file. Please continue if you have the file. |
|
2. Change the first boot disk to the CD/CDRW device in BIOS. |
|
3. Insert the installation CD |
|
4. Restart. |
|
5. Please strike any key to execute the disk restore if the message of “Strike a key when ready…” is displayed. |
|
top |
|
Question: |
What should I do when nothing happens after pressing the OS backup button? |
|
Answer: |
The reason – It is possible that some drivers (for example: SATA
or SCSI Driver) in your system cause the Xtreme Files’s software to be unable to execute the OS backup function. |
|
The
solution – Please stop using or remove the related drivers. |
|
top |
|
Question: |
I have set the “BIOS Legacy USB Support” or “USB Keyboard” and “USB Mouse”, to “Disabled” but the DOS tableau displays the message below when executing the OS backup/restore function. What should I do now? |
|
 |
|
Answer: |
The reason – The DOS USB 2.0 driver can’t detect the USB disk drive |
|
The solution – Please unplug the USB cable and plug in again. |
|
top |
|
Question: |
When executing the OS backup/restore function, after the computer restarts, the DOS tableau displays the message below: |
|
 |
|
Answer: |
The reason – Since you do not set the BIOS “USB Legacy Support” or “USB Keyboard” and “USB Mouse” to “Disabled”, the DOS USB 2.0 driver detects that the USB disk drive has been controlled by BIOS. This message indicates that if you want to use the USB disk driver provided by BIOS (probably USB 1.1 speed) to execute the backup/restore function. Please press the ESC button directly, If you want to use DOS USB 2.0 driver to execute the backup/restore function, you have to shut down the computer first and remove the USB cable and restart the computer. When you see the message below, it is OK to plug in the USB cable. |
|
 |
|
The solution – If you don’t want to see this message, please set the BIOS “USB Legacy Support” or “USB Keyboard” and “USB Mouse” to “Disabled”.
|
|
top |
|
Question: |
X series : Does total backup meaning including the operating system back up? |
|
Answer: |
No, total backup, is only to mirror image save to the x4 for data and save files from what’s configured |
|
top |
|
Question: |
X series 2.5: Why 100gb or more doesn’t detect? |
|
Answer: |
The reason is not enough power to spin the larger harddrive,
Have to use an ac adapter for the hard drive power itself rather than depending on the bus power of the usb
|
|
top |
|
 |
|

|
|
about us | contact us | site map

|
|
© 2012 CoolMax Technology Inc. All Rights Reserved. |
|


